Everyone knows about honey bees, but did you know the world of bees is so much bigger than that? Joining the show today is Dave Hunter of Crown Bees. Dave is the Bee Man! He was full of information about different types of solitary bees, native to the many different environments of North America and abroad. We talked about how bees are a wonder to gardeners beyond just honey, and why we all need to be growing our own local variety of solitary bees.
If you’re enjoying the show, you can join the discussion on the Homesteaded Homeschool Forum Discord server, or you can show your support by becoming a patron on Patreon and get access to bonus shows, seeds, and merchandise (and if you don’t like Patreon, you can sign up to support the show on BitBacker!)
For the 21st episode of Homesteads and Homeschools, we enjoy a cold fermented beverage and have a discussion with fermentation guru Sandor Katz. We discussed some of the basics of fermentation, as well as the health benefits of not just fermented food, but bacteria and some of the problems with humanity’s desire to create a sterilized environment. There is an extra bonus episode for supporters of the show.
For the 21st episode of Homesteads and Homeschools, we enjoy a cold fermented beverage and have a discussion with fermentation guru Sandor Katz. We discussed some of the basics of fermentation, as well as the health benefits of not just fermented food, but bacteria and some of the problems with humanity’s desire to create a sterilized environment. There is an extra bonus episode for supporters of the show.
There are a number of reasons I decided to start this podcast, but one of the biggest contributing factors was Jason Carriers podcast. As he said at the end of the show, there is such an overlap of values between the homesteading community and the liberty minded community. Today’s interview with Jason was certainly an entertaining one. We talked about how he got from suburbia, to horse boarder, to homesteader with his finger in everything. Jason has planted a wide array of orchards, he gardens, he raises bees and chickens, and he recently constructed his own aquaponics system. I hope this interview with Jason can bring you some inspiration and encourage you to get out there and just get started.
After the interview, I take a look at Sal Kahn’s (not the actor), Kahn Academy, a free market solution to education and one that many homeschoolers and public school students use to supplement their education.
If you’re enjoying the show, please support it on Patreon and get access to our fortnightly bonus material (and more!) (and if you don’t like Patreon, you can sign up to support the show on BitBacker!) You can also do your Amazon shopping through our Amazon link. Please subscribe and leave a review on the Apple iTunes Store (or on any podcatcher, though iTunes is the most important). You can also like us on facebook and share the show from there. We are on Twitter as @HSandHSpod, and sometimes even on Instagram, too. And don’t forget to join the The Homesteaded Homeschool Forum to be a part of the conversation.
This week the Farm Boss from Hammock Haven Farm, Kristin Hammock, stopped by to talk about goats. We talked about how she got into goats and what she does with the plethora of milk. We got into her breeding program and what she does to keep genetics fresh and healthy as well as some of the basics of keeping a goat herd. We also looked at how she manages to make keeping goats profitable.
Once the interview wraps up, the Liberty Hippie reminds you to poke your congress people and hope they actually do something productive, like signing a letter from the HSLDA and creating legislation to remove archaic laws that inhibit the ability of homeschool students to obtain jobs and go to work.
If you feel so inclined to support the show financially you can click on the Amazon link in the side bar, by checking out the Liberty Hippie’s bitbacker.io account, you can also show your support by signing up on Patreon, or by donating crypto.
I think, pretty much without fail, every holiday, or day of some named importance, has a special food associated with it: Thanksgiving has it’s Turkey, Christmas it’s ham, Valentine’s Day has Chocolate, the Fourth of July has BBQ, and St. Patrick’s Day has Corned Beef. Growing up, I was never really a fan of boiled meat, but it was tradition, and I did appreciate the salty boiled potatoes and green beer, so when I became an adult, the whole boiled meat thing kind of got lost. That was until I had kids.
The kids, of course, need to at least be aware of cultural traditions, and so, we started boiling some meat on St. Patrick’s Day. The only problem was that it wasn’t cheap and it was laden with chemicals and salt. As chance would have it, one year, we split a side of beef with two friends and somehow we ended up with the brisket; now it was uncured brisket, but it was still a brisket and so we figured why not try brining it ourselves? It was a risk, but it was only boiled meat, what could go wrong?
This was a turning point in my boiled-meat-career; it was brilliant, so much better than the pre-brined garbage you get at the grocery store. Unfortunately, the following year we didn’t purchase a cow, and we thought we would be stuck going back to the grocery store. But we weren’t! We had previously come into some venison, and thought this would be an excellent opportunity to try brining some venison roasts ourselves. It was delicious!
We eat corned venison throughout the year these days – not just St. Patrick’s Day – and everyone always loves when we do. Over the years, the recipe has changed, but the flavor is always delicious, and it’s a great way to get rid of those big old shoulder roasts (they just need to be boiled a bit longer and aren’t as tender as the other rump cuts.)
In half-a-gallon of water, boil 1/3 cup of brown sugar, 1/2 cup of kosher salt, 1/2 cinnamon stick, 2 tablespoons of whole allspice, 1 teaspoon of mixed peppercorns, 1 teaspoon mustard seeds, 1 teaspoon coriander, roughly chopped garlic cloves (you know how many you need) and other spices you want to experiment with (we’ve tried dill and fennel, both okay). Once the salt and sugar have dissolved, remove from heat and allow to cool to room temperature as you don’t want to cook the meat when covering it with brine.
When the brine has cooled, put your meat into a large sanitary container and add brine to cover. The meat will float so a weight may be necessary. Depending on the size of the container and cut of meat, it may be necessary to flip the meat daily. We usually brine our meat for five days in the refrigerator.
Before cooking, remove the meat from the brine and give it a quick rinse in the sink. Add the meat to a large sauce pot, cover with fresh water and cook just like you would a piece of corned beef you bought at the store.
When I mentioned making soda a couple of weeks ago, I also mentioned making a slightly carbonated fermented tea called kombucha. If you’re not sure what kombucha is, it is a sweet tea that has been inoculated and allowed to ferment for a period of time. It is easy to make and a whole lot cheaper than buying it from the store. Kombucha is to the fermenting world what chickens are to homesteading. It’s that gateway that introduces you to the endless world of ferments.
Ready to make a SCOBY!SCOBY after 10 days.
Making kombucha is really quite easy, but before you can start brewing batches right and left, you must come up with a SCOBY (symbiotic culture of bacteria and yeast) otherwise known as a mother culture. There are a good number of places you can find them online – a quick google search, Amazon, or heck, even us – or you can take the time to make one yourself. Making a SCOBY is not difficult, but if its your first foray into fermenting, it might seem a bit daunting; for all intents and purposes, it is not, and you probably have most of the stuff you’ll need sitting in your kitchen.
Kombucha is tea that is fermented, so you’ll need some sort of black tea, sugar, water a fermenting vessel and some plain kombucha. Later in life when you have multiple SCOBYs you can experiment with different types of teas, but the different oils and compounds can effect your SCOBY adversely so it’s recommended to start with a basic black tea. (After using a SCOBY in non-black tea, I give it to the chickens and use another mother next time.) Sugar is another important factor for making kombucha, like any ferment, the bacteria and yeast need sugar to feed on. White refined sugar is what the internet and all the books claim works the best. I have tried different types of sugars and have noticed no difference in taste. Again, to start, use white sugar, and once you get going go ahead and experiment. Remember that honey is an anti-microbial and while it may work for kombucha, it slows the process and hurts the SCOBY. Some people put a lot of focus on the water, saying you have to use filtered water or bottled water. I haven’t found this to be an issue, so long as you don’t have chlorinated water, you should be fine. If your water is chlorinated you can buy bottled water, or let your water sit in a container with an open top (use a coffee filter) and let the chlorine dissipate into the air for a day or two. As far as fermenting vessels go, I’ve used an empty glass gallon jar; it started out full of pickles. Or if a gallon of kombucha is too much, you can get a half-gallon mason jar.
Ready to go!
The last key ingredient is the kombucha culture can be obtained from the store. Technically you should use plain kombucha for making a SCOBY as it doesn’t have the additive flavors and oils, however I have been able to use flavored kombucha when the store didn’t have any plain.
Now it’s time to make your SCOBY. It is simple. When you make your first SCOBY you don’t want a huge batch of kombucha, so you could start with a quart size jar while you eat all your pickles.
Start with a cup of water and ¼ cup of sugar. Heat the water up with one black tea bag or one tablespoon of loose black tea and dissolve the sugar.
Allow the tea to cool to about 70-80°F and remove the tea.
Add your bottle of kombucha. You can add the whole bottle, or you can add less, just make sure to get the visible strains and yeast from the bottom into your batch.
Put a breathable top on your container (rubber bands and coffee filters work well).
Put the container in a warm (70-80°F) place and let it rest.
In a few days – seven at the latest – you’ll start to see a baby SCOBY forming on the top.
In two or three weeks, you’ll have a decent sized mother and will be able to start fermenting your own batches of kombucha.
Making your first batch of kombucha is essentially the same as making a SCOBY, extrapolate the ratios and add your mother with a half-cup of starter tea and you’re off!
There is something oddly soothing about seeds. You’ll know the feeling if you’ve ever dug your hands into a garbage can size box of loose seeds at the local nursery or if you’ve managed to be able to keep and harvest your own seeds. (If you’ve never been able to do so, I suggest going to the bulk section of the grocery store and shoving your hands in the unpopped popcorn bin. Just don’t let anyone see you…). I can’t place if it’s the actual texture and feel of hundreds of cool seeds gently caressing your skin, or if it’s the growth and food potential packed into all those seeds, but something about hundreds of tiny seeds is just awe inspiring.
And beans are further spectacular for all their intricate patterns and designs. I can’t be sure, but I’m willing to bet that like a snowflake, no two non-single color beans are patterned the exact same way. They may have a general pattern, but when you actually study each beans seed coat, the differences are amazing.
Just like snowflakes, but so much cooler!
The main staple bean we have chosen to grow is a Potawatomi Lima bean. It’s of the pole variety, easily climbing an eight foot pole, while continuing to look for somewhere higher to grow. Originally, the Potawatomi Limas came from the Potawatomi Indians in Southern Michigan. Our choosing the Potawatomi Lima wasn’t random but a calculated choice with multiple factors:
Their location of origin was key. While we are in Georgia now, we were living in Vermont when we purchased these seeds. If you’re familiar with Vermont, you’ll know that the summer is fleeting and the weather is cool and damp. Without a greenhouse, there are some definite constraints when it comes time for growing. So a Lima – which otherwise has a very hard time growing in New England – needed to be cold weather friendly, and it seemed like Southern Michigan was a good bet.
Pole variety! We really wanted a pole bean as it would get off the ground and clear some space up for other crops – like potatoes. We were on 1/5th of an acre at the time.
These limas provide two types of food. The beans could be eaten green as shelled beans or dried and used as a dry bean.
It’s a lima bean! By growing a lima bean (Phaseolus lunatus), it meant that we could grow a common bean (Phaseolus vulgaris) for green beans, and we wouldn’t have to worry about cross pollination.
In Vermont these beans worked out great. We didn’t have huge pulls of beans, but we had plenty to keep us happy and they made a great supplement to our CSA. It was also evident that while they don’t like the cold, they weren’t’ as fragile as some other beans I’ve grown when it came to cold nights.
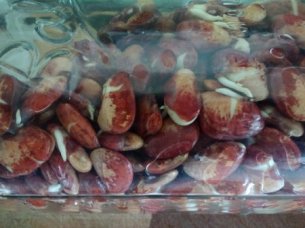
Soaked, sprouted, and ready to cook.
The Potawatomi Limas have done just as well, if not better, in Georgia. We’re able to get them in the ground early and we end up having two crops of dried beans. (We only save seed from the first crop.) We are also able to get a good number of green beans for shelling. And of course, because of the dry lima pods ability to pop open and shoot seeds everywhere, we always find random volunteers germinating some place we didn’t plant them. More often than not we let them grow, but even when we have to kill them, they make an excellent cover crop/green fertilizer.
Overall, we are very impressed with this variety. Over the last ten years, we’ve been saving seeds from pods with four beans. In the beginning, we had mostly two and three beans per pod with the occasional four-bean-pod. We still don’t have a plant with only four-bean-pods (that won’t be for another 20 years down the road, maybe…), but their prevalence is much higher and the number of two-bean-pods is significantly lower. We’ve tried a variety of beans in the garden, and while I never thought I’d fall in love with a lima bean, so it has become. Do you have a favorite vegetable variety you go back to every year?
I can’t tell you when I started dabbling in ferments. My earliest recollection is trying to make some country wine in my basement when I was probably thirteen or fourteen. It was a total crap shoot. I put some sugar in a mason jar, threw in some fruit and a bit of yeast, then flipped the jar over into a wider basin of water to create a seal of sorts. Needless to say it turned out poorly and was unsuccessful. (I’ve since made some palatable stuff…) Into college I dabbled with brewing beer and trying to make some ‘shine, but it wasn’t until I lived in South Korea for a year that I really started a love affair with fermented foods, all thanks to kim chi. It is a goal of mine to one day make some kim chi that actually tastes like an ajumma made it, and not some stateside grocer, but that’s a story for another day.
There are a million different fermented dishes you can make, some are time consuming, require special tools, and mountains of time, others, like oatmeal, are extremely simple. I first came across this idea reading one of Sandor Katz’s books. (I couldn’t tell you which one; they’re all excellent.) Almost everyone these days have heard of overnight oats. Some folks will soak them overnight, some cook them overnight in a slow cooker, some soak them and eat them raw the next morning. It may sound loopy, but here’s the basic reason why:
Oats and other grains contain phytic acid. Phytic acid is known to bind to certain nutrients therefore hindering the bodies ability to absorb these nutrients. Soaking (particularly in an acidic environment) helps to break this phytic acid down. You can achieve an acidic environment by using whey – kefir, yogurt, etc. – apple cider vinegar, lemon juice, or anything else you can think of that might lower the pH. You can also skip the additives and really let those oats ferment naturally lowering the pH of the solution. Typical instructions will call for the oats to be soaked in cold water, or even left in the refrigerator, over night; the problem is, this cooler environment doesn’t allow for much fermentation. Ideally, you want to soak your oats on the counter from 12-24 hours to really break down the phytic acid, but there’s more.
Fermented foods have particularly rich flavors, sweet and sour, tart, tangy, and dense. If all you want to do is break down some phytic acid, soak your oats for 12-24 hours in a warm environment. If you want all the funky flavors of a delicious fermented dish here’s our technique.
Raisins, covered in spices.
Before I even throw the oats in the mason jar, I toss in a handful or raisins. The raisins add some sweetness and some naturally occurring yeast (which is a good thing.) If you don’t have raisins, other fruits with naturally occurring yeast can work – berries, apples. Once the raisins are in, I add my spices: usually some fresh minced ginger, cardamom, cinnamon and turmeric. When I can find it, I’ll use garam masala, or if I’m having a later afternoon snack, I’ll throw in a bit of curry powder. If I
Ready to wait. By the end, that banana will not be recognizable.
want it a little sweeter, I’ll add in some ripe banana. Really the possibilities are endless, and it is up to you and your taste buds
Ready to go! The oats are floating, the bubbles are bubbling.
The amount of oats, and size of container I use depends on who’s going to be eating them with me. My son is not a big fan, but my daughter will eat a whole cup if I allow her. Once the oats are in, I cover them with water, screw on a lid, and let them go. On average, I’ll wait a good two days, though less when it’s summer, and a little longer in the winter. The trick is to really let the fermentation kick in. Typically, mid-way through day two, I’ll start to see tiny bubbles welling up from below and it begins to look like one big gloppy mess. When I see these things, I’m know I’m good to go.
These really are one of the simplest fermented dishes you can make. Once you’re happy with how the little guys are doing with your oats, it’s time to cook them. Dump them in a pain, and cook. I use a low heat, and stir. Because they’re so dense and gloppy, they tend to burn a little bit if you let them go without stirring for too long. If they’re too thick coming out of the jar, you can always add a little water.
When the oats are warmed thoroughly, we serve them! (Imagine that…). Typically we don’t add sugar, but on occasion my daughter can convince me that they need a little Maple Syrup. Either way, they’re delicious.
A little butter and milk never hurt anyone. (It’s yellow from the turmeric.)
Addendum: We have experimented with adding chia to the ferment, this requires more water. We have also tried this with grits, and steel cut oats. The soak times for steel cut oats is a little longer, but both turned out equally as well. Other ways to reduce phytic acid is to sprout the item in question (think beans.)
I’m always searching for fun easy ferments (or even more difficult ones) so if you have any favorites, let me know in the comments.


 We eat corned venison throughout the year these days – not just St. Patrick’s Day – and everyone always loves when we do. Over the years, the recipe has changed, but the flavor is always delicious, and it’s a great way to get rid of those big old shoulder roasts (they just need to be boiled a bit longer and aren’t as tender as the other rump cuts.)
 In half-a-gallon of water, boil 1/3 cup of brown sugar, 1/2 cup of kosher salt, 1/2 cinnamon stick, 2 tablespoons of whole allspice, 1 teaspoon of mixed peppercorns, 1 teaspoon mustard seeds, 1 teaspoon coriander, roughly chopped garlic cloves (you know how many you need) and other spices you want to experiment with (we’ve tried dill and fennel, both okay). Once the salt and sugar have dissolved, remove from heat and allow to cool to room temperature as you don’t want to cook the meat when covering it with brine.